This is a macro based Excel spreadsheet that I wrote to allow me to enter the chords for a song into the spreadsheet, analyze the chords to find all the scales the could be played over the chords and draw out the scale notes on guitar fret boards with 24 frets for each scale. It was important that I be able to choose the scales drawn on the guitar fret boards. I also wanted to be able to “play” the fret boards in the order of the chord changes in the song by right clicking a mouse (see note a bottom of post for a better solution) with my toe (since my hands were busy playing the guitar). This is the main function of this spreadsheet. There are other functions that fall out of these objectives. I will detail all the functions below.
Note: Midi port capabilities have been added to these macros. Please read the section on “Midi Ports” and the legal disclaimer at the end of this post.
Spelling Out Scales
The spreadsheet spells out scales and analyzes them. It is written in Excel 2007 so it should work for anything beyond that. One reason I wrote it is because I got tired of doing it manually for a bunch of odd jazz scales in various keys.
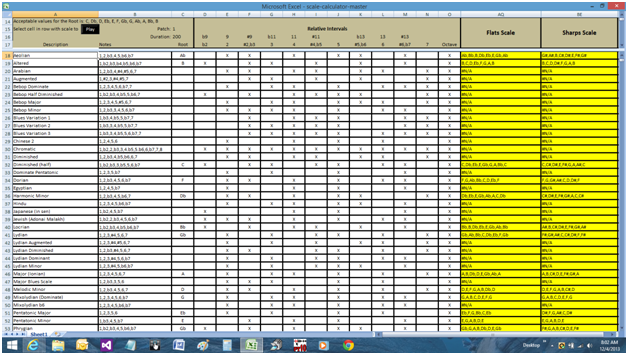
The “Description” and “Notes” columns are for whatever text you want. Please use only one space between each word in the description.
The “Root” column is for the scale root (either upper or lower case). Sharps (#) are not allowed for the “Root” cell, only flats (“b”) are allowed for roots. If you want a root with sharps, just enter the equivalent flat key or non-flat key. The scale root can easily be changed once the scale has been defined. You can define the scale by putting an “X” (or any character) in the appropriate “Relative Intervals” columns. If you leave the “Root” cell blank the scale will be disabled without have to take all the data out. It can easily be re-enabled by putting a valid root back in the cell. Also, the analyze routine will not take time to analyze the scale if it is disabled. If all the scales are enabled it can take some time to analyze. Over 5,000 scales can be defined in the spreadsheet. If songs have redundant chords the scales do not have to be re-analyzed to save time in the analysis.
You can play the notes in the scales as well in the spreadsheet by selecting the cell in the row where the scale is located that you want to hear and clicking on the “Play” button. You can only play scales which are enabled. You can also change the patch and duration of the notes played.
The spelled out scales are shown in flats and sharps in the “Flats Scale” and “Sharps Scale” columns. You can copy them and paste them into other apps.
You can sort the scale columns A through O with the normal Excel sorting routines starting at row 18. However, the best method for sorting is explained later using addition backup and master sheets. Sorting can be used for any sort criteria you want. As an example, the sort could be used for separating scales into genres and modalities. This can be done by changing the “Description” field to something like “Jazz Bebop Dorian”. The rows can have redundant scales and can be sorted into genres like jazz, rock, classical, etc. and further divided into modalities. The analysis results could also be sorted by selecting the columns DW through DY starting at row 18 with whatever sort criteria you want. However, the best method for sorting the song analysis results is explained later using additional backup and master sheets. A macro has also been included to provide “Custom Sorting” discussed a little later.
Single Scale Analysis

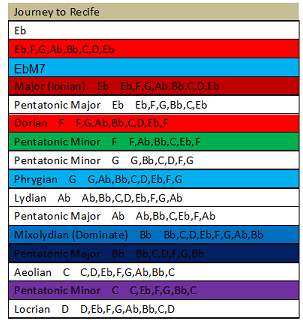
Analysis has been added to analyze a target scale or chord and find all subsets of scales which have the same notes as the target. The algorithm goes through all keys and all the scales which are in the spreadsheet and enabled. It finds any other scales which have the same notes or a subset of the same notes. This will allow you to find other scales which will work for lead riffs.
Additionally, there are cases when complete scales are not spelled out for song chords. For example, a dominate G7 chord could be spelled as G,B,D,F,G. In this case, an incomplete spelling of the scale in row 16 scales would not show most of the completely spelled out scales in the results since the completely spelled out scales are not subsets of the incomplete chord spelling. In the 12/23/13 revision, the analysis has been modified to show possible scales which could work for this case. These possible scales are show with a leading asterisk (*) in the description field of the song analysis results. The asterisk indicates that the chord, the incompletely spelled out scale, is a subset of a more completely spelled out scale from columns A through O. However, these scales may or may not work for your song depending on the additional notes that were not completely spelled out in the chord and the mood of the song.
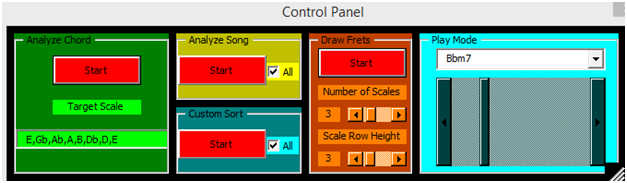
To start the analysis, bring up the control panel by clicking on the “Show Control Panel” blue button. The “Show Control Panel” can be moved around and resized by clicking, holding down the left mouse button on the diagonal bars in the lower right part of the panel and moving the mouse. The scroll bars can also be used to move the display around within the panel.
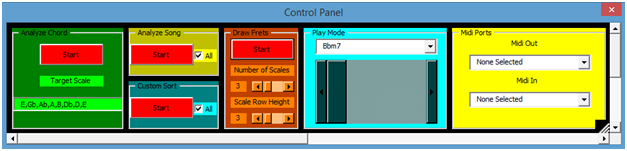
The light green text box under the “Target Scale” label in the “Analyze Chord” panel should be pasted with the master scale (or chord) to be analyzed. To paste from the “Sharps Scale” or “Flats Scale” column into the light green text box, first copy (shortcut keys are ctrl-ins) the scale you want to analyze from the “Flats Scale” or “Sharps Scale” column. To paste into this text box use the mouse to select all the previous contents of the text box and use the shortcut keys shift-ins or type in the scale you want to analyze. Any other time you are pasting to cells in “Sheet1” use the “Paste-Paste Values” paste on the “Home” tab. Important note: Always use the “Paste Values” paste for any paste into “Sheet1” of the spreadsheet to avoid pasting formatting information into “Sheet 1”. When you press the red “Start” button you will see all the scales currently in the spreadsheet go through all possible keys to find subsets of scales which have the same notes as the target scale. The red “Start” button will change to a green “Stop” button while the analysis is running. If you want to stop the analysis before it finishes simply press the green “Stop” button. The button will turn red and display “Stop” again. You can also navigate around the spreadsheet while the analysis is running but perhaps a little more slowly. All the “Start” buttons work in this fashion. The analysis will preserve your initial scales when it is done.
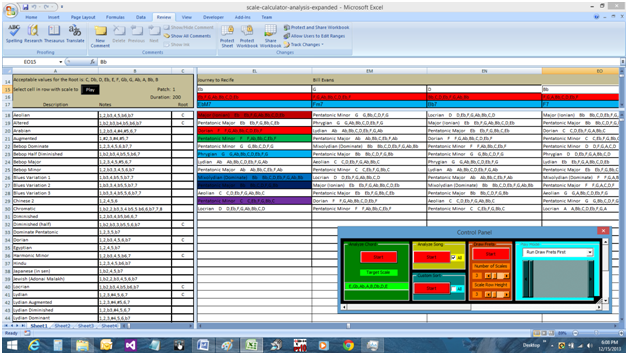
Analyze Song
The “Analyze Song” panel will take chord values you provide in the order which they occur in the song and do a scale analysis on each chord in the song. All scales which are enabled and found starting from the key of “C” to “B” will be displayed on the analysis results shown below.
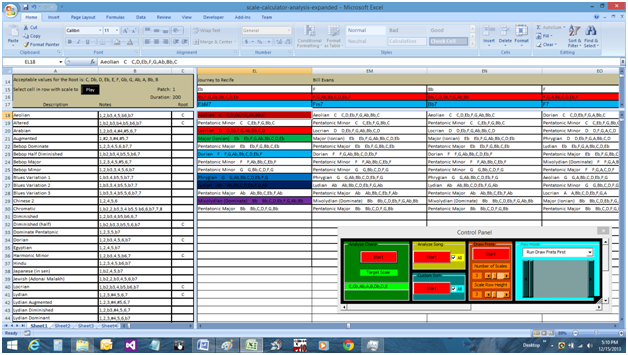
The song results start from column EL and go all the way out to column OL (you will probably never need the full range). Song result are allowed up to 60 scales which you will also probably never need.
To enter a song you must put the chords starting in the order encountered in the song in row 16 starting at column EL. You should put the chord symbol on row 17 below the scale that describes it. Row 15 will be described later in the “Custom Sort” section. Row 14 (“EL14”) is for the title of the song. This is useful as the macro will put the title of the currently loaded song in “Play Mode” with the title “Control Panel” so you can always see what song is currently loaded. If the title just states “Control Panel” no song is loaded into “Play Mode”. The meaning of the colored cells and the first 20 bold line in the column EL song results will be discussed in the “Draw Frets” section. However, just to note, you can modify the colors in the cells at column EL to change the colors of the scales drawn on the fret boards.
After you enter the song chords as described you can click on the “Start” button in the “Analyze Song” panel to start the song analysis. The button works the same as described in the “Start” button in the “Analyze Chords” panel.
If the “All” checkbox is checked the whole song will be analyzed from the starting chord to the last chord. Note that if you start an analysis of the entire song any previous song results are deleted immediately so make sure that is what you want to do before you press start.
IMPORTANT NOTE: Do not delete “Sheet1”, “Sheet2” or “Sheet3”. They are needed by the macros.
Additional sheets, “Recife Frets”, “Recife Scales”, “Blues1 Frets”, “Blues1 Scales” and “Scales By Genre”, have been added as examples of saved data on backup sheets. These types of sheets can be edited, added and deleted to save previous songs or anything you want from “Sheet1”, “Sheet2” or “Sheet3”. Editing of scales or song data should be done on these additional sheets. Any type of editing is allowed on these additional sheets and will not mess up anything on “Sheet1”, “Sheet2” or “Sheet3”. After you edit them you can do a paste by values into scales or song data in appropriate cells in “Sheet1”. The fret diagrams on the additional sheets should not really be pasted into “Sheet2”. The “Draw Frets” routine should be run to generate the diagrams and re-load the “Play Mode” chords. However, these diagrams can be saved on additional sheets for print outs or future reference. The “Scales By Genre” sheet show backups and examples of different ways to organize your scales. This will be discussed more later in the custom sorting section.
If a chord has the same scales found as another chord (for example all natural chords in the song key) the analysis will just use the previous results to save time. All the found scales will be ordered in the same way from the key of “C” to “B” after the analysis is complete. If “All” is unchecked you can analyze an individual chord in a column but you must select a cell anywhere in the appropriate column that you want to individually analyze before you press analyze.
Custom Sort
Row 15 in the song section of the spreadsheet is used to sort the song analysis results by the number of the note in the scale in row 16. This number is not the interval, it is the number of the note shown in row 16. If the number is not a real number for a note shown in row 16, the sort will be skipped. This is useful if you want to see the song analysis results in the order of a certain note in the scale shown on row 16. Additionally, this will also be useful in the “Draw Frets” discussion later.
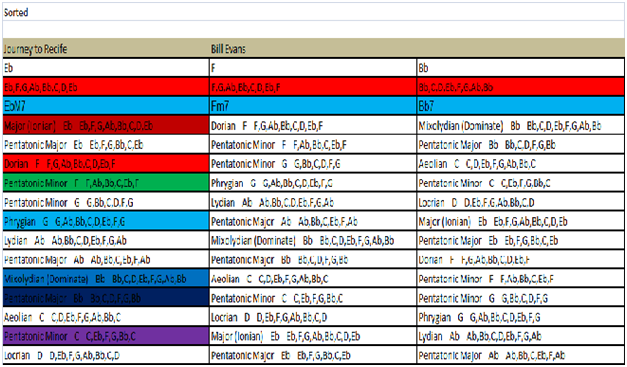
If the “All” checkbox is checked, the custom sort will go through the whole song. If a note value is place in column 15, the note will be used as the starting point for sorting out the song analysis results. Any note can be utilized in this field even if it is not in the scale. If the “All” checkbox is not checked you must select an individual cell the in song column that you want to sort. The effect of the custom sort is shown below:
Naturally, you can also sort the song results scale using the normal data sort routine in Excel. Just make sure you start the sort on row 18 or preferably, sort the song analysis data on a backup or master sheet, as previously discussed, and paste the values into “Sheet1”.
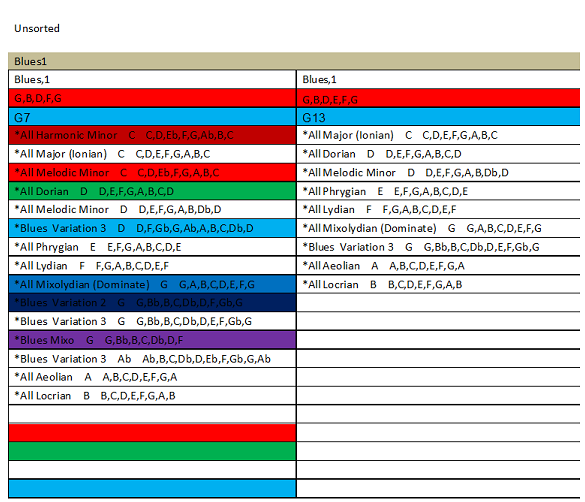
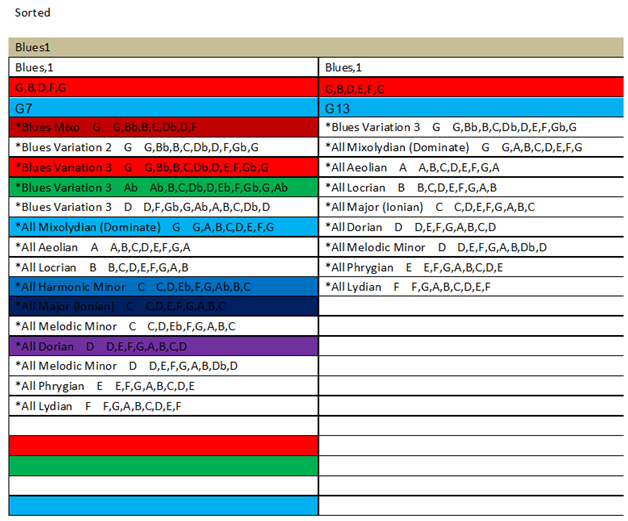
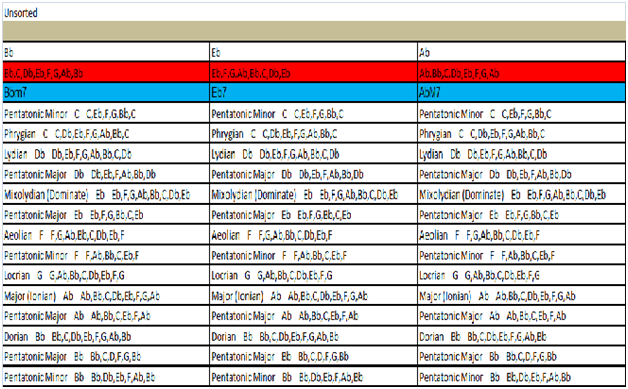
The 12/23/13 revision has enhanced the custom sorting ability to utilize genre sorting. With this revision you can do nested sorting. The nested sorted is done by genre first then, sub-sorted by starting note (or note number) OR by starting note (or note number) then, sub-sorted by genre. The former is probably more useful when using scales by genre. The format of the cell in row 15 of the song analysis section of the spreadsheet is “genre,<note or number>” or “<note or number>,genre” with no spaces. For example, if the description in column A of the defining scales has the genre “Blues” at the beginning of the description (no space before the genre name and one space after the genre name in the description) you could specify that the sort be done first with the genre “Blues” and then by note number using this parameter in row 15: “Blues,1”. The sheet below shows the unsorted sheet after song analysis is run with the parameters set in row 15 and the next sheet shows the results of the sort.
Draw Frets
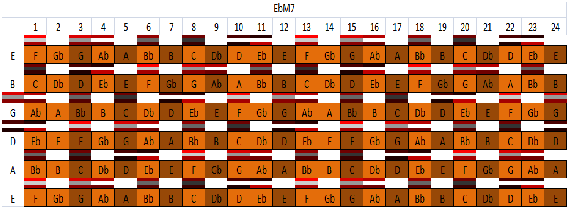
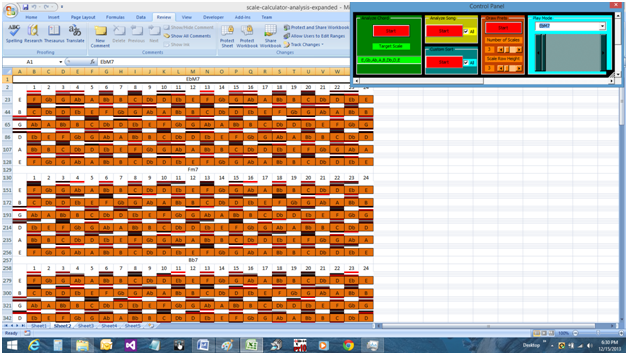
The fret boards are shown in “Sheet2”. The “Draw Frets” section is used for the drawing the fret boards. The fret boards are drawn in order from the start of the song to the end of the song. However, if chords have the same song analysis results in the same order, the fret boards are identical and are combined into one fret board with all the chord names for the fret board shown on the first line.
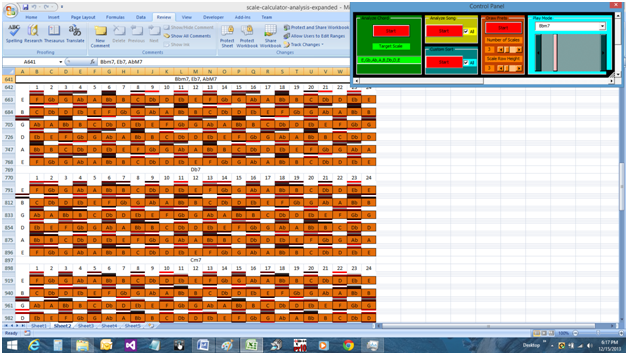
Notes for the scales are shown above the perspective string. The first scale notes in the first song results column underneath the chord symbols on “Sheet1” is drawn first just above the perspective string. The second scale notes in the second song results column underneath the chord symbols on “Sheet1” is drawn second just above the perspective string and so on. Up to 20 scales can be drawn depending on the number of scale you selected in the “Number of Scales” selector in the “Draw Frets” panel. On “Sheet1” the first 20 scales in the song analysis have bold borders to indicate the 20 scale limit on the fret boards. You can also select the row height in the “Scale Row Height” selector (up to 20).
If you use Windows standard colors in column EL (the first column for song chords), the colors for each scale row start out light for the root and increasingly get darker as the scale note goes up until the root is hit again and gets lighter. This helps you discern the scale step on the fret board. The second scale, the pentatonic scale, starts out white and get darker as the notes go up until it gets white again at the root as shown below:
Because we did a custom sort on the first few chords of the first fret board shown, a unique fret board is drawn for this chord.
If a fret board has the same scales in the same order in the song analysis results on “Sheet1”, the fret boards with their notes are the same so the chord names are all combined in the header of the fret board as shown below:

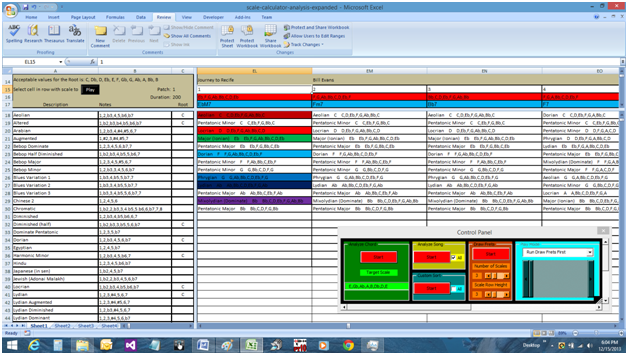
If you want to change the colors in column EL you need to “Unprotect Sheet” “Sheet1” on the “Review” tab. Select the cell on “Sheet1” column EL that you want to change the color of and go to the “Home” tab. You will see a spilt paint bucket icon. Click this icon to select the background color you want. When you are done, select the “Review” tab and “Protect Sheet” again. You can click on “OK” on the next dialog without changing any of the values. The protection is really to keep you from making accidental changes to cells that should not be changed so it is in your interest to make sure the sheet is protected.
Play Mode
Play mode is used for displaying the chords as you play along with them in the song.
The chords in the drop down box are in the order of the song as shown below:
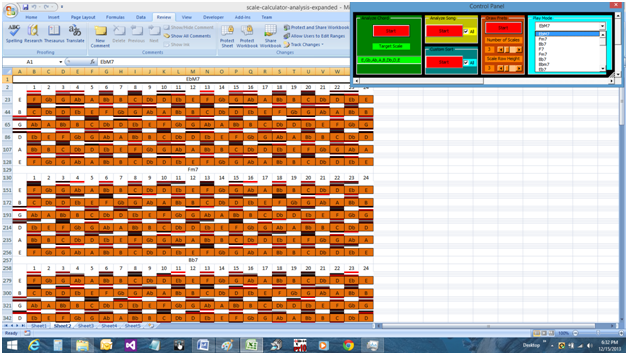
You can “fast forward” or “rewind” to other parts of the song using the drop down box. The other control lets you step through the chords forward or backward by clicking on the direction arrows. Since you will not have a free hand while you are playing, you can right click the mouse button with your toe to go one chord forward in the display. Make sure the mouse cursor in somewhere in the “Sheet2” cell area for this to work properly. Also, click on the cell in the first row ad column before you start after rebuilding the fret board.
Midi Ports

Midi capability has been added to these macros. It is important that, if you plan to use this, you understand what it can do and the issues associated with Excel and Midi BEFORE you use the software. Personally, I love this new feature. The midi out port allows you to send a midi controller command (CC:4 – foot pedal) out whatever midi out port you select. When you click the right mouse button in “Play Mode” or press the foot pedal the CC command will get sent. This allows you to record the chord transitions in whatever midi sequencer you like. Whenever you record the chord changes in your sequencer it is important that you record these commands on a clean track without other midi data. Make sure that no other midi information is sent out on the midi port the CC:4 commands get sent to. It is also important that you disable midi thru in your sequencer on the port you are recording the commands on. These chord changes will then become part of your song or practice chords. Please note that if you right click on a cell “Sheet2”, you can cycle through all the chord changes, including the first one, loaded in “Play Mode”. If you start the record on the last chord in your chord sequence and right click at the start of the record, you will send the first chord at the beginning of the record sequence. This also works with the foot pedal. This is useful when you start recording midi data to your sequencer. Also, you can edit the time of the chord changes in your sequencer if you need to.
The midi in port will accept the commands when you play the sequence on your sequencer and track the chord changes with the changes in your song or chord exercises. I have found the foot pedal works well for shorter chord sequences but longer chord sequences seem to work better with the midi in port. Also, the midi in port allows access to anywhere in the song. It tracks with the sequencer where ever you are in the sequence which makes it a nice feature. Additionally, the midi in and midi out ports cannot be opened simultaneously. This is done intentionally to prevent midi thru problems.
A Few Other Notes
If you accidentally mess up “Sheets1” through “Sheets3” you can bring up a copy of the original workbook and copy your saved sheets to new sheets in the original workbook. Most of the important cells in “Sheets1” through “Sheets3” are protected and you cannot change them anyway.
If you run a “Analyze Song” or “Custom Sort” you will need to redraw the fret boards before you can use them again so the changes will get incorporated properly.
“Sheet3” has no use for the user so don’t mess with it. It is protected so you can’t change it anyway.
If the scale spelled out for the chord in a song on row 16 has sharps the fret board will show the notes in sharps otherwise the notes will be shown as flats.
IMPORTANT NOTE: Always use the Paste Values paste for any paste into “Sheet1” of the spreadsheet to avoid pasting formatting information into “Sheet 1”.
IMPORTANT NOTE: Do not delete “Sheet1”, “Sheet2” or “Sheet3” (although I don’t you can anyway since they are protected).
If you are going to paste song data in “Sheet1” from another backup sheet, you will have to run the “Draw Frets” macro again. There will be no indication that you need to run it if you had a previous song already loaded. There is no way to for the macro to know that you pasted another song in the sheet. The previous song will still be loaded.
If you are pasting song results or scale data into “Sheet1” from a backup or additional sheet make sure you delete values from any previous results in “Sheet1” so you do not have mixed data between the new data and the previous results.
If you paste into a cell from a source outside Excel, make sure you use Paste-Paste Special-Values from the Home tab to keep formatting information from getting pasted.
Do all your editing on additional sheets and use the Home tab, Paste Values feature to paste the data from your additional master sheets. You can use all the sorting and editing features in Excel in these additional sheets without messing up anything on the main macro based sheets.
One note about sorting in Excel, make sure you uncheck the “My data has headers” checkbox on the sort menu so all the data will get sorted correctly.
Remember, the right click for play mode assumes that the mouse cursor is over a cell on “Sheet2”.
Use no more than one space in the description field to separate words in the description (i.e., “This is an example”.
Adding the ability to interact with the spreadsheet while and analysis is running also allows other tasks on your PC to run so I recommend turning off your network connection and disabling things like background virus scans from running while running the macros. I also do this for all my recording software applications.
Here are the downloads:
Here is the easy way to incorporate the workbook into Excel if you computer is being nice to you today:
1) Click on the link above
2) Click on open
4) Once the workbook opens in Excel you will have to save it with a different name so you can get write access to it.
Here is how you incorporate the workbook into Excel if your computer does not like you today:
1) Right click on the link and click on “Save target as…”
2) Save the file to a known location. As a general rule virus protection programs refuse to let you use your computer in any meaningful way so you may have to deal with them at this point.
3) Bring up Excel and load the workbook from wherever you saved it
If you plan to use the midi feature you will need to extract the Excel Add-In by clicking on the link below:
Here is the easy way to incorporate the add-in into Excel if you computer is being nice to you today:
1) Click on the link above
2) Click through all the “Run”, “Run”, “Yes”, “Are you really Sure?”, “Really?”, “What gives you the right?…you think you own this computer or what?, “FORGET IT”, blah, blah, blah…
3) When unzip comes up click on “unzip”
4) After you run though a few more redundant questions from Excel, hopefully the add-in will get installed.
5) You can check to see if the add-in is installed in Excel by opening Excel, clicking the Office button, Excel Options and Add-In button.
6) Oh, if you have Norton you will get a pop up box at some point asking for your attention. If you ignore it Norton may just decide to delete the file at a later time just for the hell of it.
Here is how you incorporate the add-in into Excel if your computer does not like you today:
1) Right click on the link and click on “Save target as…”
2) Save the file to a known location. As a general rule virus protection programs refuse to let you use your computer in any meaningful way so you may have to deal with them at this point.
3) Extract the files to a known location on your hard drive.
4) Close the extractor.
5) Double click on the “ScaleAnalysisMidiPortAddin” Windows Batch File.
6) At this point Excel will ask you if you want to install the add-in. Proceed with the install and the midi port drivers will get installed as an add-in to Excel.
7) You can check to see if the add-in is installed in Excel by opening Excel, clicking the Office button, Excel Options and Add-In button.
One more thing, if you try to re-install the same add-in, Excel will tell you that everything is up to date. If you want to uninstall the add-in, you can go to the control panel, add/remove programs and uninstall “ExcelAddIn1”.
Note: If you get a message complaining about security and Excel macros you need to click on the Office button in the top left, Excel Options, Trust Center, Trust Center Settings, Macro Settings, Check “Enable All Macros”, exit the application and reopen the spreadsheet…don’t you sleep better at night knowing the Microsoft is looking after you (@#$#)?
Note: After trying the right mouse button on a mouse I found the mouse moves around too much. To solve this I took an old USB mouse apart and attached a regular foot pedal to the right mouse button switch with a little soldering work. The foot pedal works great. I also found that gamers use foot pedals for these buttons so I ordered a $10 USB gamer foot pedal at Amazon that I think will work. this pedal worked great but it needs to be correctly setup with the little CD which comes with it to only send a right mouse click and nothing else when the pedal is clicked. The foot pedal also keeps the mouse cursor in one place so it remains over “Sheet2” without moving around. Here is the setup menu after I modified it:
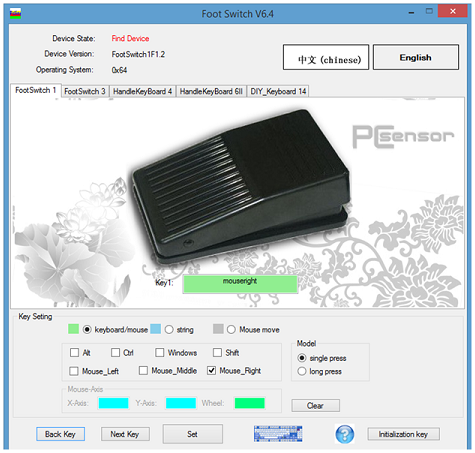
Make sure it is not sending a right mouse click and a “b” which it seemed to want to do at first.
P.S. – Here is a great website for guitar players. It is free and provides lots of graphic information concerning scales on the guitar, chords, etc.
http://www.all-guitar-chords.com/guitar_scales.php
Revision History:
12/15/13
Added song analysis, custom sorting and control panel
12/23/13
Added incomplete chord spelling in the song analysis as indicated with an asterisk.
Added genre sorting to the custom sorting section
Added a few more scales
Added examples of additional sheets
Fixed an aborted song analysis to restore the original roots for the column A through O scales
12/27/13
A minor change to “Play Mode” to go back to the beginning after the last chord. This enables looping without having to do any manual manipulations to go back to the start.
12/28/13
Fixed a couple minor bugs
12/29/13
Added some more color to the fret board to make frets more easily discernible
1/5/2014
Added midi port capability
Also, fixed the control panel resize diagonals so they track with scroll and resize.
1/7/2014: The Spreadsheets – Rev. 1, ExcelAddIn – Rev. 1.0.0.0
Added the name of the loaded song to the control panel title taken from cell “EL14”
Do not download the software unless you agree to this…
THIS SOFTWARE IS PROVIDED ON AN AS IS BASIS, WITHOUT WARRANTY OF ANY KIND, EITHER EXPRESSED OR IMPLIED, INCLUDING, WITHOUT LIMITATION, WARRANTIES THAT THE SUBJECT SOFTWARE IS FREE OF DEFECTS, MERCHANTABLE, FIT FOR A PARTICULAR PURPOSE OR NON-INFRINGING. THE SOFTWARE PROVIDER ASSUMES NO RISK AS TO THE QUALITY AND PERFORMANCE OF THE SOFTWARE. SHOULD THE SOFTWARE PROVE DEFECTIVE IN ANY RESPECT, THE SOFTWARE PROVIDER ASSUMES NO COST OR LIABILITY FOR ANYSERVICING, REPAIR OR CORRECTION. THIS DISCLAIMER OF WARRANTY CONSTITUTES AN ESSENTIAL PART OF THIS LICENSE. NO USE OF ANY SUBJECT SOFTWARE IS AUTHORIZED HEREUNDER EXCEPT UNDER THIS DISCLAIMER.
UNDER NO CIRCUMSTANCES AND UNDER NO LEGAL THEORY, WHETHER TORT (INCLUDING, WITHOUT LIMITATION, NEGLIGENCE OR STRICT LIABILITY), CONTRACT, OR OTHERWISE, SHALL THE SOFTWARE PROVIDER BE LIABLE FOR ANY DIRECT, INDIRECT, SPECIAL, INCIDENTAL, OR CONSEQUENTIAL DAMAGES OF ANY CHARACTER WITH RESPECT TO THE SOFTWARE INCLUDING, WITHOUT LIMITATION, DAMAGES FOR LOSS OF GOODWILL, WORK STOPPAGE, LOSS OF DATA, COMPUTER FAILURE OR MALFUNCTION, OR ANY AND ALL OTHER COMMERCIAL DAMAGES OR LOSSES, EVEN IF THE SOFTWARE PROVIDER SHALL HAVE BEEN INFORMED OF THE POSSIBILITY OF SUCH DAMAGES. THIS LIMITATION OF LIABILITY SHALL NOT APPLY TO LIABILITY RESULTING FROM THE SOFTWARE PROVIDER ‘s NEGLIGENCE TO THE EXTENT APPLICABLE LAW PROHIBITS SUCH LIMITATION. SOME JURISDICTIONS DO NOT ALLOW THE EXCLUSION OR LIMITATION OF INCIDENTAL OR CONSEQUENTIAL DAMAGES, SO THAT EXCLUSION AND LIMITATION MAY NOT APPLY TO YOU.